Instructions
Everything you need to set up Genesis and build your first bot. New here? The Quick Start below gets you running in five steps — sections 1 and 2 cover each step in detail, and section 3 onwards is reference material for when you want to fine-tune.
Quick Start
From zero to your first bot:
- Download RiD-Installer.exe (you'll need an active subscription).
- Run the installer — choose an install folder, finish the setup, then launch
RiD.exe. If Windows SmartScreen appears on either, click More info → Run anyway. - Set the Required GFX Settings in-game.
- In Genesis, select your Environment (OSRS, RS3, or an RSPS).
- From the Create tab: name your bot, set the blue grid, then calibrate by playing 5–10 cycles of your task.
Before your first calibration, read the Calibration Tips — two minutes of reading saves a re-do.
1 Initial Setup
1.1 System Requirements
- Windows 10 or 11.
- On Mac or Linux, you can run Genesis using a virtual machine. All the resources you need are here.
1.2 Download
You'll need to subscribe first to gain access.
1.3 Install & Run
Run RiD-Installer.exe. Select the folder you'd like to install Genesis to, then click through the setup. At the end there's a checkbox to add a desktop shortcut — tick it if you want quick access. Once the installer finishes, launch RiD.exe from the install folder or your desktop shortcut.
Windows SmartScreen may show a blue "Windows protected your PC" screen when running the installer or the app for the first time. This is normal for new releases — click More info, then Run anyway.
Currently there are no known issues with any AV giving Genesis a false positive (via VirusTotal), but some antivirus software is suspicious of automation tools by nature. If your AV quarantines Genesis, restore it and add an exclusion for the RiD folder. Only ever download Genesis from this site.
1.4 Required GFX Settings
Genesis is graphics based and comes with Environments for RS3 and OSRS built in. You can create Environments for other games too. But for RS3/OSRS all you need to do is make sure you have the Required GFX Settings »
1.5 Minimizing (optional)
You can run Genesis minimized, using a Virtual Machine (VM). Here are instructions for setting up:
2 Bot Creation
2.1 Environments
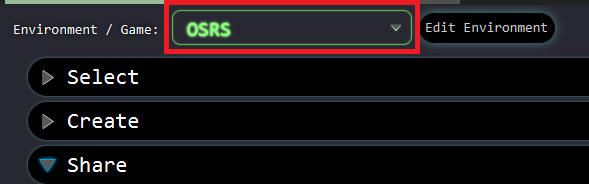
To get the best out of Genesis with video games, you must first show it what the game GUI looks like. We do this by setting up an 'Environment': what the buttons look like, where they are on screen, along with special GUI components like the compass, map and world view. Environments for OSRS, RS3 and several RSPS are included by default, so most users never need to create one. Just select your Environment from the drop-down menu highlighted below.
2.2 Brief Overview
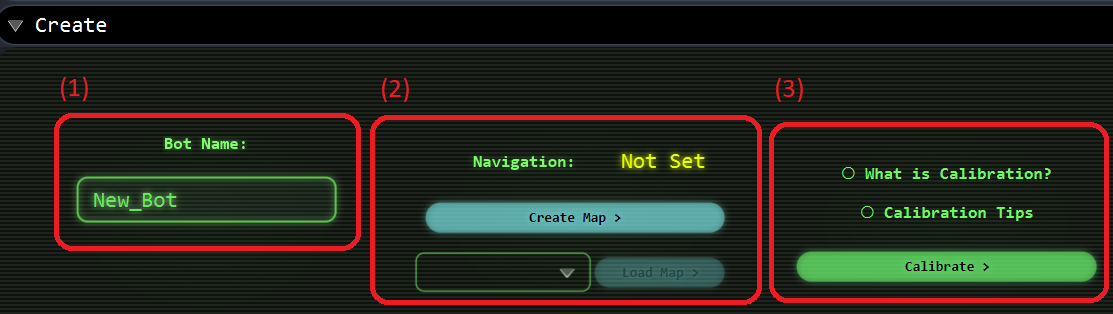
There are three simple steps toward creating a bespoke bot with Genesis, and no programming knowledge is required. From the 'Create' tab: (1) name your bot, (2) set up navigation, and (3) calibrate.
2.3 Navigation
Navigation is optional, and only matters if you are playing a game with a map and want to move between locations. Stationary bots don't require a map. To create a map, press the 'Create Map' button, then simply walk around the area(s) you want to operate in. Alternatively you can use the 'Load Map' button to load a map from another Genesis bot on your local machine.
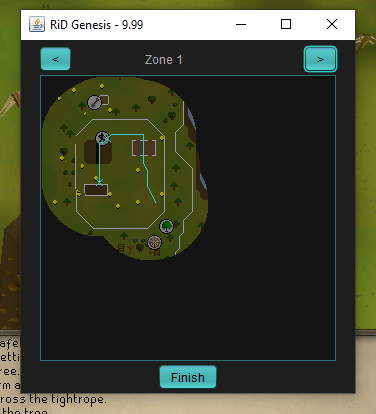
After map creation, you will see a map of the area with the path you walked highlighted in cyan. Make sure the path is correct before you continue (if not, try again walking more slowly). It should look something like this:
2.4 Camera Settings (aka 'blue grid')
Prior to calibration you must set Camera Settings. You can also adjust camera settings post-calibration, so you don't need to run the bot with the exact same camera settings you calibrated with. Camera settings simply allow the bot to coordinate between locations on the map and tiles in the 3D world. It doesn't need to be perfect, but wildly inaccurate Camera Settings will lead to errors, so don't skip this step. Center the grid at your character, then adjust zoom and pan until the grid matches the tiles in-game.
Tip: if nearby tile centers aren't clear, drop a few items nearby to see more clearly.
2.5 Calibration
Genesis learns repetitive tasks, and your biometrics, by watching you play. This process is referred to as 'Calibration' and results in an editable blueprint of the task (see Machine GUI) that is unique to you at the biometric level. It is a good idea to read the Calibration Tips below first.
A countdown will pop up. Once it reaches zero, perform 5–10 repetitions of the task, then click 'Finish!' Now wait a minute while Genesis creates a bespoke bot from your calibration data.
2.6 Calibration Tips
- Your task should have a repetitive nature — do not deviate from the task during calibration.
- You MUST perform at least 5 full cycles of the task (or 5+ minutes if cycles are short).
- Excessively long calibrations have an increased chance of error.
- Anything in the 3D world you interact with (World Items) ought to have clear outlines.
- If you want to use Navigation (walk around) you must create a map of the area before calibration.
- It is recommended to navigate using the mini-map.
- If using the world view to navigate, try to click plain areas without foreground (so the bot doesn't think you are clicking an object).
- You may rotate the camera during calibration (left or right), but don't adjust pan (up or down) or zoom. And be consistent — use the same angle(s) on each cycle. For example: you want to turn east to click the bank, and west to click the furnace... then face east for all your bank clicks and west for all your furnace clicks, every cycle.
- A top-down camera pitch works best, and avoid extremes with zoom (too far or too close can both cause problems).
3 Bot Editing
3.1 The Machine GUI
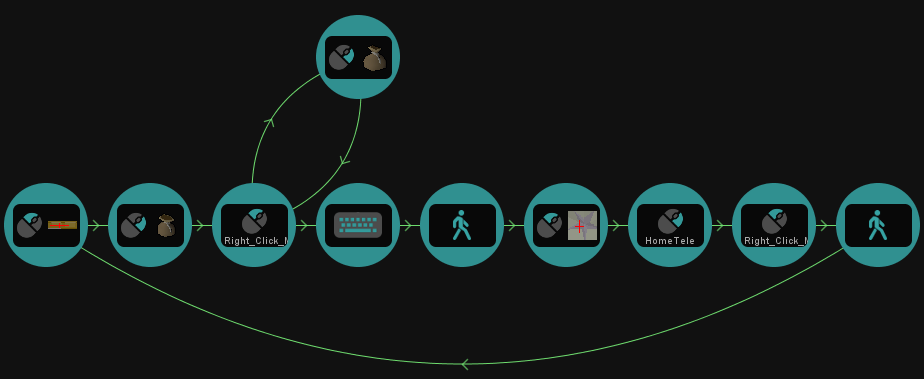
Each bot you create with Genesis has its own 'Machine', which can be edited! Editing is done from the 'Machine GUI', which opens automatically immediately after calibration. The Machine GUI can also be reached by selecting your bot and pressing the 'Edit' button. Actions are represented by Orbs, and they are connected by Arrows which represent the action sequence — the order in which to perform actions.
3.2 Genesis at Runtime
The typical cycle of the bot at run-time is: (1) select action, (2) perform action, (3) confirm action (otherwise try again), (4) finish action, then repeat back to (1). You have control over this entire process through the Machine GUI. There is also an error-handling mode, where the bot will attempt to identify the appropriate action based on current status (this cannot be influenced by the user). Error handling only occurs when the regular cycle fails.
3.3 Action Options
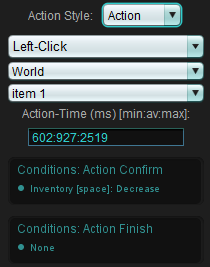
There are two options for 'Action Style': Action and Reaction. Actions will only be performed sequentially, whereas Reactions can occur at any time in the action sequence. Genesis will return to where it was in the action sequence after a Reaction is finished — unless there are arrows leading away from the Reaction orb, in which case Genesis will continue from those arrows instead.
Immediately after an action is performed, Genesis begins checking for the 'Action Confirm' conditions. If they are not found, it will make another attempt. If they are found, it proceeds until the 'Action Finish' conditions. Two things to note about 'Action Finish' conditions: (1) they will not be checked until the minimum 'Action Time' throttle has elapsed, and (2) if they are not found after the maximum 'Action Time' limit, Genesis will assume the action has finished. If you have no Finish conditions, the action finish is decided purely on timing — Genesis picks an appropriate duration using your 'Action Timing' values.
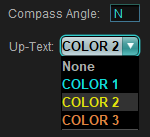
World-Item clicks (NPCs or other objects in-game) include an option for 'Compass Angle' (if there is a preferred viewing angle — the 8 options are N, E, S, W, NE, NW, SE, SW) and 'Up-Text' (if colored text appears at the top of the world screen when you mouse over the world item). Up-Text is optional; if you select a color for Up-Text, the bot will not click unless it sees the selected color text after it moves the mouse to the target.
3.4 Conditions
Conditions are mostly (but not limited to) observations made in-game at runtime — some examples: inventory becomes full, you arrive at a location, an NPC appears on screen. Conditions are used in three scenarios: (1) Action Confirm, to determine if an action is successful or not, (2) Action Finish, to signal when to end an action and move on to the next, and (3) Arrow Conditions, used for action selection and decision-making based on in-game status. You can edit all three types. The first two you edit from the action orb; Arrow Conditions you edit by clicking on the arrow itself. You can also create new arrows between orbs by selecting the source orb, then dragging to the destination orb.
3.5 Decision Making
After an action finishes, Genesis selects the next action by examining the arrows available from the completed-action orb. Each arrow can be assigned conditions, all of which must be true for the arrow to be considered. Where multiple paths are available, the bot selects based on probabilities. Genesis will also consider 'Reaction' orb conditions, and will prioritize Reactions ahead of ordinary arrow pathways. Arrows with no conditions are a special case: they are lower priority, and will only be selected when no conditional pathways are available.
3.6 Special Conditions
3.6.1 — Control Flow Variables
Control Flow Variables are conditions that make your bot repeat a sequence of actions X times. There are two types of control flow conditions: (1) increment (increase) an integer value, and (2) check an integer value.
Say you want to cast a spell 4 times in a row then click a bank chest, and you already have these two actions set up. Set an arrow from the spell action back to itself with the condition 'Control Flow Variable: increment A', and an arrow from the spell action to the bank chest action with the condition 'Control Flow Variable: A = 4'. Each time the bot performs the spell it increases A, until A = 4, at which point it moves to the bank chest action and resets A back to zero. If you have multiple actions in your repeatable sequence it works the same way: put an 'increment A' at the first step (arrow) of the sequence, and the 'A = X' condition on the arrow that exits the loop, where X is the number of times you want to perform the loop.
3.6.2 — Timers
Similarly to control flow variables, there are two types of Timer conditions: (1) Start Timer, and (2) Timer = Finished. You need to set up both to get it functioning. First create a 'Start Timer' condition, give the timer a name and set three values: the minimum, average, and maximum value (in milliseconds). It's usually good practice to set your min and max around 10% below and above the average — so if your average was 100ms, then 90ms and 110ms would be a good min and max, depending on what you're aiming for.
Say you have an auto-fighter and want to modify it to drink a potion every 2 minutes: create a 'drink potion' action, and link it to the 'attack' action with two arrows, one going to and one going from the 'drink' action. Put the 'Start Timer' condition on the arrow that goes back from 'drink' → 'attack' (this starts/resets the timer after the drink action completes). Set the average time to 120000 milliseconds (2 minutes), with a suitable min and max. Now put the 'Timer Finished' condition on the arrow that goes from 'attack' → 'drink' (this tells the bot to check the timer after each attack completes — if the timer has expired, it moves to the 'drink' action).
3.7 Bot Editing Examples
- Add things that did not occur during calibration — such as eating food below a certain health value.
- Swap interface items — for example, update your Maple Fletcher to a Yew Fletcher.
- Swap world items — for example, to fix a bot that's struggling to find world items.
- Fix minor calibration errors — such as a condition not being picked up correctly.
- Group similar items together into a single action.
Don't swap world or interface items for items of a vastly different size/shape, and don't edit bots to drastically change their functionality or timing.
3.7.1 — Add Things that Did Not Occur at Calibration
Create new action(s) by clicking + at the top-left of the Machine GUI, set the action type, then link the new action to your machine with arrows. For example: you created an auto-fighter but didn't eat during calibration, and want it to eat food when below 50 hp. First (if it wasn't in your inventory during calibration) add the food item to 'Interface Items' on the right-hand side. Create a new action, set it as 'left-click → food item'. Finally, drag two arrows to link your new action to the machine: one arrow from 'attack monster' to 'eat food' with the condition 'health < 50', and a second arrow from 'eat food' back to 'attack monster' with no conditions. And you are done!
Note: if you do not set a 'less-than' or 'greater-than' symbol when setting integer variables, it will default to 'equals'.
3.7.2 — Edit Interface Items
This is one of the most common reasons to edit your bot — some training methods have a progression where the materials involved change as you level. You can edit interface items directly from the right-hand side panel. Select the item you want to swap out, and either click 'Load' (to load an item from another calibration) or 'New' (to capture a new item from your screen, with the game open in the background).
3.7.3 — Edit World Items
Similar to swapping interface items: select the item you want to swap from the World Item panel on the right-hand side. Click 'Load' (to load from a past calibration) or 'New' (to create a new world item from the screen, with the game open in the background). Increasing color-strictness can speed up search time, and reducing shape-strictness is a good idea for animated world items that move around and need to be visible from multiple angles. Follow the instructions in the bot GUI.
Ideally you'll get a blue box only around your target(s). If you end up with false positives (blue boxes in unwanted areas), you can prevent them being targeted at run-time by limiting the search area — see 5.2.1 — Set Search Area.
3.7.4 — Fix Minor Calibration Errors
This should be increasingly rare, but if you notice the bot performing actions at the wrong times at runtime, it may be due to a misconfiguration at calibration. Go to your Machine GUI and look at the conditions on your arrows. If you see anything incorrect, delete/edit/add conditions to make sure your bot behaves the way you want.
3.7.5 — Group Similar World/Interface Items Together
Sometimes you have multiple items but want them handled the same way. For example: you are powermining, and during calibration you didn't pick up any gems — but you want the gems dropped just like the ores. You can do this by grouping gems and ores together. Or another example: an auto-fighter with 3 different types of NPC. The bot attempts to recognize groups automatically, but if it fails you could end up with two (or more) attack actions, which is not optimal. To repair this, unlink the additional 'attack' actions (by deleting arrows), leaving a single 'attack' action. Then go to 'World Items' on the right-hand side, select the NPC you want to add to the group, click 'Drag', then drag it over to the 'attack' action. Once all 3 NPCs are grouped together, the 'attack' action treats all 3 NPCs equally — better than having separate actions.
4 Bot Sharing
4.1 Downloading Bots
Bot Sharing is done directly from the application. Just log in, select an Environment, then click the 'Share' tab. Bots available to you will be listed here. The number in brackets is the average run-time before the bot encounters an error. Also listed: the date the bot last completed a long session, a preview of the bot structure, and a description written by its creator.
4.2 Sharing your Bots
The Bot Sharing list is curated automatically, to keep everything on the list relevant. To be eligible for sharing, a bot must be performing well, performing reliably, and have been used recently.
There are two types of sharing: Public Sharing (your username is shared as well) and Anonymous Sharing (your username is kept secret). You can also opt out of sharing entirely if you are on an Ultimate or ViP subscription. For everyone else, if your bot qualifies, it goes into the Share pool.
To view or edit Share status, select a bot and use the 'Share' and 'Anonymous' checkboxes. Ultimate and ViP members can also click the symbol next to the bot name to change status:
- Tick — your bot, available for sharing.
- Padlock — your bot, unavailable for sharing.
- Heart — downloaded bot, from Bot Share.
4.3 How Biometrics Work for Shared Bots
Biometric details of the original calibration are stripped before uploading, so just the framework of the task remains. After downloading, Genesis looks at calibration sessions you have performed locally, and uses this data to set up an appropriate biometric profile. If no calibrations have been performed locally, a generic biometric profile is generated automatically. Genesis keeps the original creator's biometric data, and any other information about them, private.
5 Troubleshooting
| Symptom | Start here |
|---|---|
| Genesis can't find the game | 5.1 Cannot Find Environment |
| Bot misses or can't find objects/NPCs | 5.2 Trouble Clicking World Items |
| Bot fails before completing one full cycle | 5.3 Crashing Early |
| Bot runs fine, then eventually stops | 5.4 Crashing After a While |
5.1 Cannot Find Environment
This happens when you have incompatible graphics settings. The only exception is if there's been an in-game graphics update within the last few hours, but this is very rare — 99.99% of the time it's your graphics settings. The required graphics settings are here. If you are unsure which setting is off, contact us on Discord or the forums and we'll help you.
5.2 Trouble Clicking World Items
One of the most common points of failure with Genesis is finding world items. But in the vast majority of cases, this is easily resolved. Work through these in order:
5.2.1 — Set Search Area
The bot focuses on certain areas of the screen when it searches. To check it's looking in the right place: go to the Machine GUI and select any World Item to see the area it will be searched for, on the map. You can edit the area — left-click-drag to expand it, or right-click to delete it. Also ensure the blue grid is set correctly, otherwise search areas will not work as intended.
5.2.2 — Update the World Item Profile
At calibration the bot automatically creates a world item profile, but you can also do this manually. If you're having problems, try updating the world item profile — see Edit World Items.
5.2.3 — Try Color-Based World Items
This is a legacy feature, but there are cases where color-based detection outperforms pattern matching. Set primary color(s) (which MUST be present for a positive ID) and secondary colors (additional colors that make up your object, but are not mandatory), until you get a blue box around the image of your item in the GUI.
5.2.4 — Highlight World Items
If playing OSRS, you can do this using RuneLite. At the time of writing, you hold Shift and right-click the world item to set highlights in RuneLite. Highlighting world items will guarantee success, as well as improve speed and reliability.
5.2.5 — Reduce Zoom
Even when using highlights, you may still have problems if you are zoomed in way too much. The vision system (both pattern-matching and color-based) filters out background pixels — and if you are zoomed in like a complete psycho, the bot may mistake your huge world item for background pixels. I know some people do this to reduce misclicks, but misclicks are important for the bot to appear humanlike, and Genesis is designed to recover from them. So don't worry — play with a normal level of zoom.
5.3 Crashing Early (without completing a cycle)
If your bot struggles to complete a full cycle of the task, something substantial is wrong with your calibration. The following steps should help you figure out what.
5.3.1 — Check the Map is Valid
It is vital to have a single zone image per area in-game. If your bot just walks around (without teleporting or changing floors via a ladder), you should have ONE zone image. If you go up a ladder once, you should have two separate zone images: one for downstairs and one for upstairs. If your map is fragmented (e.g. you have two zone images for the downstairs area, so downstairs is essentially in two pieces), that's a problem. A faulty map will cause your bot to fail, and there's no point calibrating without first having a valid map. To fix it, try creating the map again while walking more slowly. If you still can't get it working, notify us on Discord or the forums and we'll look into it.
5.3.2 — Check Calibration Data
You can play back everything the bot saw you do at calibration — useful to make sure the bot read your actions properly. If the bot misread any clicks during calibration it can lead to miscalibration, and you'll be able to see exactly what's wrong here. Go to the Machine GUI and click the 'Calibration Data' button, then watch the replay of your calibration. Be on the lookout for three things:
- (A) World Item misreadings. Check the bot recognized the correct world item on each click. If not, you may be able to fix it by editing your bot (such as grouping similar items together) or re-calibrating.
- (B) Misreadings on GUI clicks. This could indicate in-game GFX have updated recently, or the button/menu you are clicking hasn't been added to the Environment yet (in which case you could add it yourself, or report it to us). If it is sometimes recognized but sometimes not, you may be clicking so fast the bot failed to recognize what you were clicking — slow down your clicks a little and re-calibrate.
- (C) Map misreadings. Assuming your map is valid (as described in 5.3.1), misreadings on a valid map aren't something you can fix yourself — report it to us.
5.4 Crashing After a While
If your bot works for at least one whole cycle, then your bot structure, World Items, and Map are all probably fine — one particular step has failed eventually. When your bot quits it displays recent activity, along with any problems (highlighted in red) before it terminated. Check the Activity Report; you should be able to figure out the problem from there, but let us know if you need any help.
Ask on Discord or the forums — include your Activity Report and a screenshot, and we'll get you sorted.